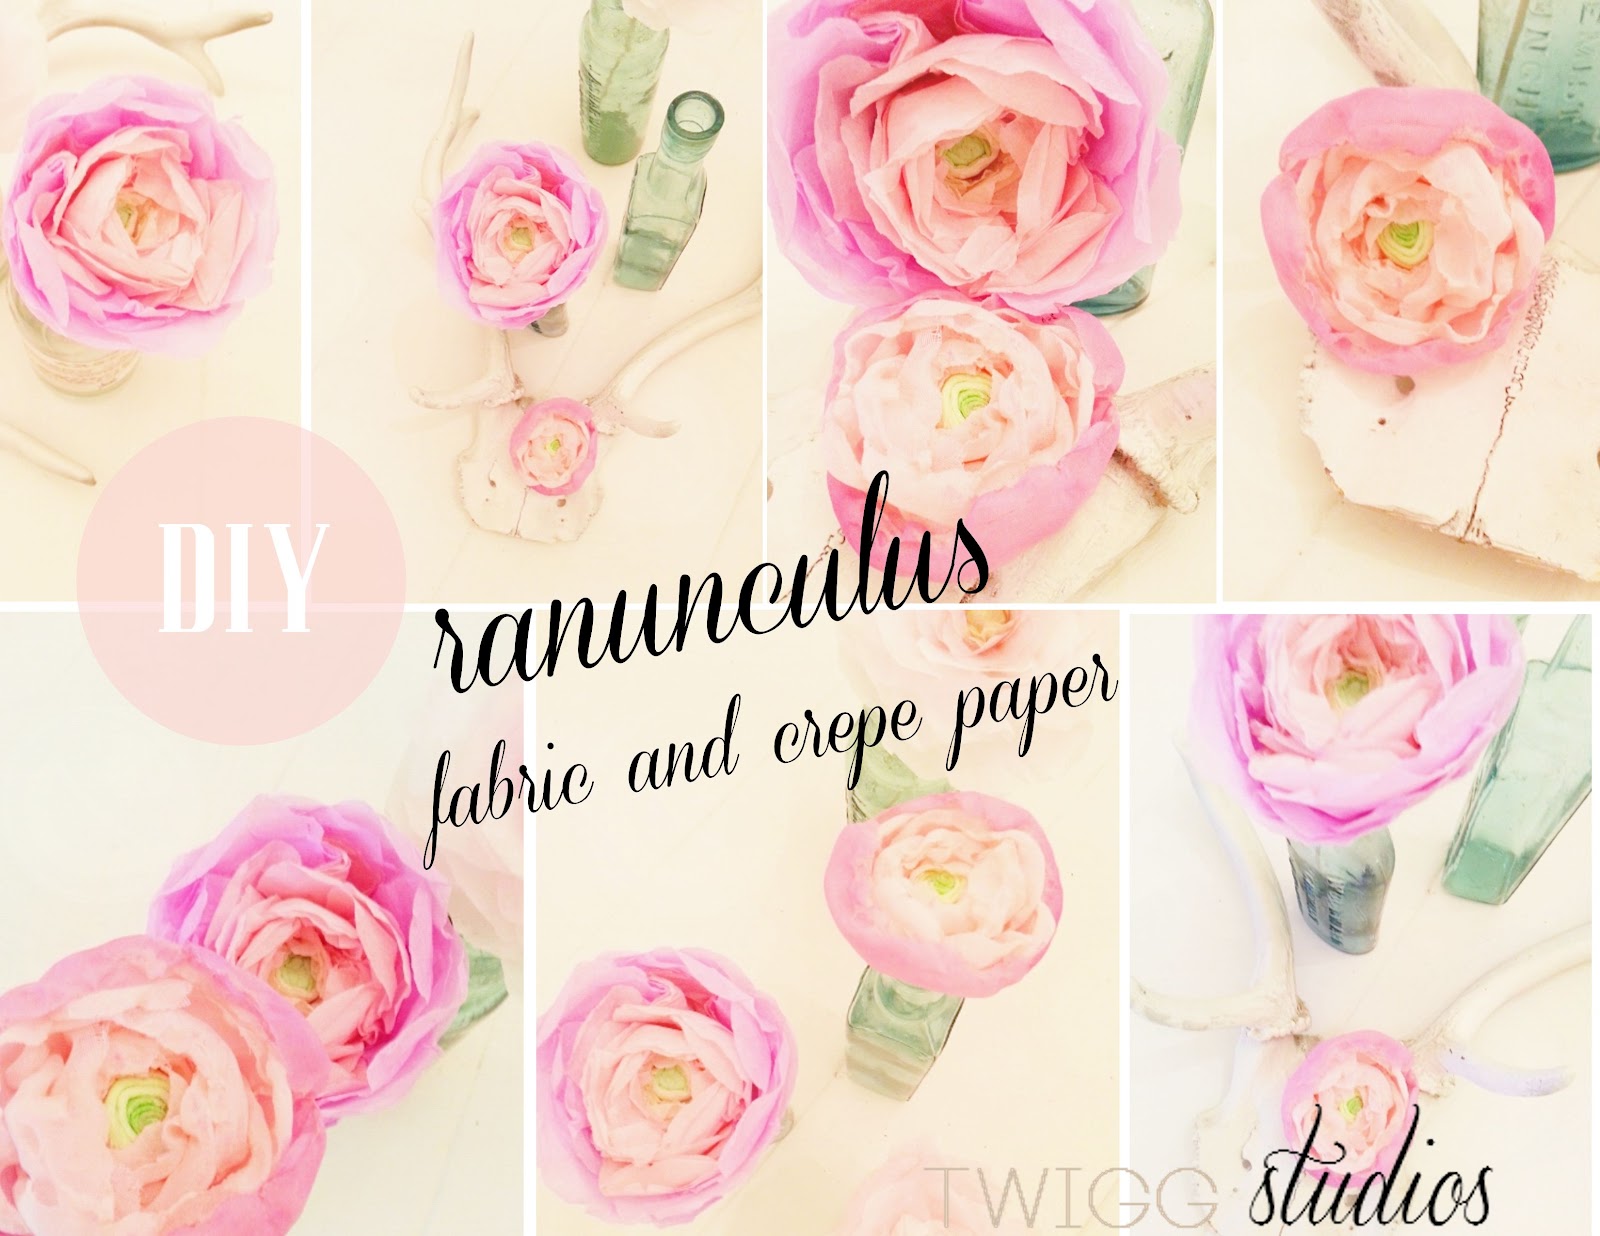

crepe paper

for the crepe paper ranunculus is used green yellow and two shades of pink,
i also used a kebab skewer and some glue.
first roll up a ball of the green crepe paper then cut a square and cover in glue and push the skewer into the ball and use the square to cover the ball and attach it to the skewer.
then cut a strip and fold in half and wrap around the ball, then take some yellow crepe paper and cut another strip and wrap it around again, then fold the crepe paper so you can cut multiple petals at the same time, and cut a small petal shape. this saves time as you will get loads in one go of the same size. then start gluing them around layering them ontop of each other, leaving a small gap between each one, then do the same with the paler pink crepe paper, cut it in two larger sizes than the yellow. take another kebab stick and use it to roll the edges of the crepe paper in towards the centre.

now take the darker pink crepe paper, and fold it again so you can cut multiple petals in the same shape and size. and cut larger petals take 3 petals and fan them out then fan the bottom edge and glue on to the back, this adds shape. then once they are all on cut some more to make the underneath look neat, then take the skewer again, and roll any petals in that need it.

fabric
for this you need netting or silk fabric, i used pink fine net material,
you will also need a candle
some fabric in green and yellow for the middle (i just painted some white fabric with water colour paints)
glue gun
i cut lots of circles in different sizes, the i held them above the candle this curls the edges in, don’t hold it to close or it will burn the fabric or turn it black. once that’s done roll up the green fabric in a spiral, and glue it, then rap the yellow strip around it, (fold the fabric in half so the rough edges are at the back)
then take the smallest petals and start gluing them around. the centre piece and keep adding them, then with the two larges end petals, i used some bright pink water colour paint and tinted them darker, then put them at the back one overlapping each side.


alderberry hill
inspired by felicity
vintage mauve
cowgirl up party
serendipity and spice
home maker on a dime
inspired by felicity
vintage mauve
cowgirl up party
serendipity and spice
home maker on a dime

teagans travels
uncommon
debbie does creations
real housewifes of riverton
adventures of a diy mum
vintage wanna bee
the kurts corner
the winthrop chronicles
pinkopotamus
a diamond in the stuff
embracing change
our thrifty ideas
crafty confessions
naptime delights
uncommon
debbie does creations
real housewifes of riverton
adventures of a diy mum
vintage wanna bee
the kurts corner
the winthrop chronicles
pinkopotamus
a diamond in the stuff
embracing change
our thrifty ideas
crafty confessions
naptime delights

sew much ado
diy dreamer
jaqs studio
crafty scrappy happy
raegun ramblings
southern lovely
the gilded hare
restore interiors
savvy southern style
faded charm
boerman ramblings
diy dreamer
jaqs studio
crafty scrappy happy
raegun ramblings
southern lovely
the gilded hare
restore interiors
savvy southern style
faded charm
boerman ramblings

the ny melrose family
i gotta create
52 mantels
the artsy girl connection
spruce your nest
beyond the picket fence
i gotta create
52 mantels
the artsy girl connection
spruce your nest
beyond the picket fence

creation corner
bacon time with the hungry monster
little becky homecky
marriage from scratch
kitchen fun with my 3 sons
bacon time with the hungry monster
little becky homecky
marriage from scratch
kitchen fun with my 3 sons

i cant stop crafting
jolly jane
nutmeg place
rustic crafts &chic decor
polkadot pretties
too much time on my hands
jolly jane
nutmeg place
rustic crafts &chic decor
polkadot pretties
too much time on my hands

sisters of the wild west


This is perfect, Aimee! So simple, but effective!
Looks great!
I hate to repeat myself, but yqour blog is awesome.
Thanks again,
XOXO,
CRISTINA
Oh these are so very beautiful. I just love them. It's spring here, they would be perfect.
Oh my! These are beautiful! I'm so excited to try…thank you for the tutorial!
I never grow tired of these colors, no matter the season. They are so pretty and it looks quite doable with some practice.
Liz
These look amazing, I'm going to give them a go this weekend 🙂
These are simply perfect!
Thank you for sharing!
They are definately going on my pinterest board!
One of my very favorite flowers!
Beautiful flowers! I can't wait to get some tissue paper and make some!Thanks for sharing at Gettin' Krafty!
Very pretty! I love all the variety of flowers that can be crafted!
They are both beautiful! Thanks for the How-to. 🙂 Did you cut the crepe paper petals in the yellow colour after you attached them?
http://www.seaweedandraine.com
I would love to have you link up with us at the Clever Chicks Blog Hop this week!
http://www.the-chicken-chick.com/2012/10/clever-chicks-blog-hop-5-happy-hen.html
I hope to see you there!
Cheers!
Kathy
The Chicken Chick